Sweet Tooth Experiments

  • About Me
  • Recipe Index
  • Baking Metrics
  • Tips & Tricks
  • Common Baking Questions
  • Contact

Category Archives: Ice-cream cake

Peanut Brittle and Chocolate Ice-Cream Sandwich

Posted on September 5, 2020 Posted in Ice-cream & Sorbet, Ice-cream cake .

I recently was experimenting with peanut brittle and ended up with a LOT of brittle and not much to do with the excess. Usually I would take it to work but with my working from home scenario all the brittle was not leaving the house. So, I decided to make up a recipe that featured the brittle. With my recent ice-cream experimenting trend, ice-cream was on my mind, but I didn’t want to have too many steps to the recipe, I wanted to make it simple easy, scrumptious and quick prep time.

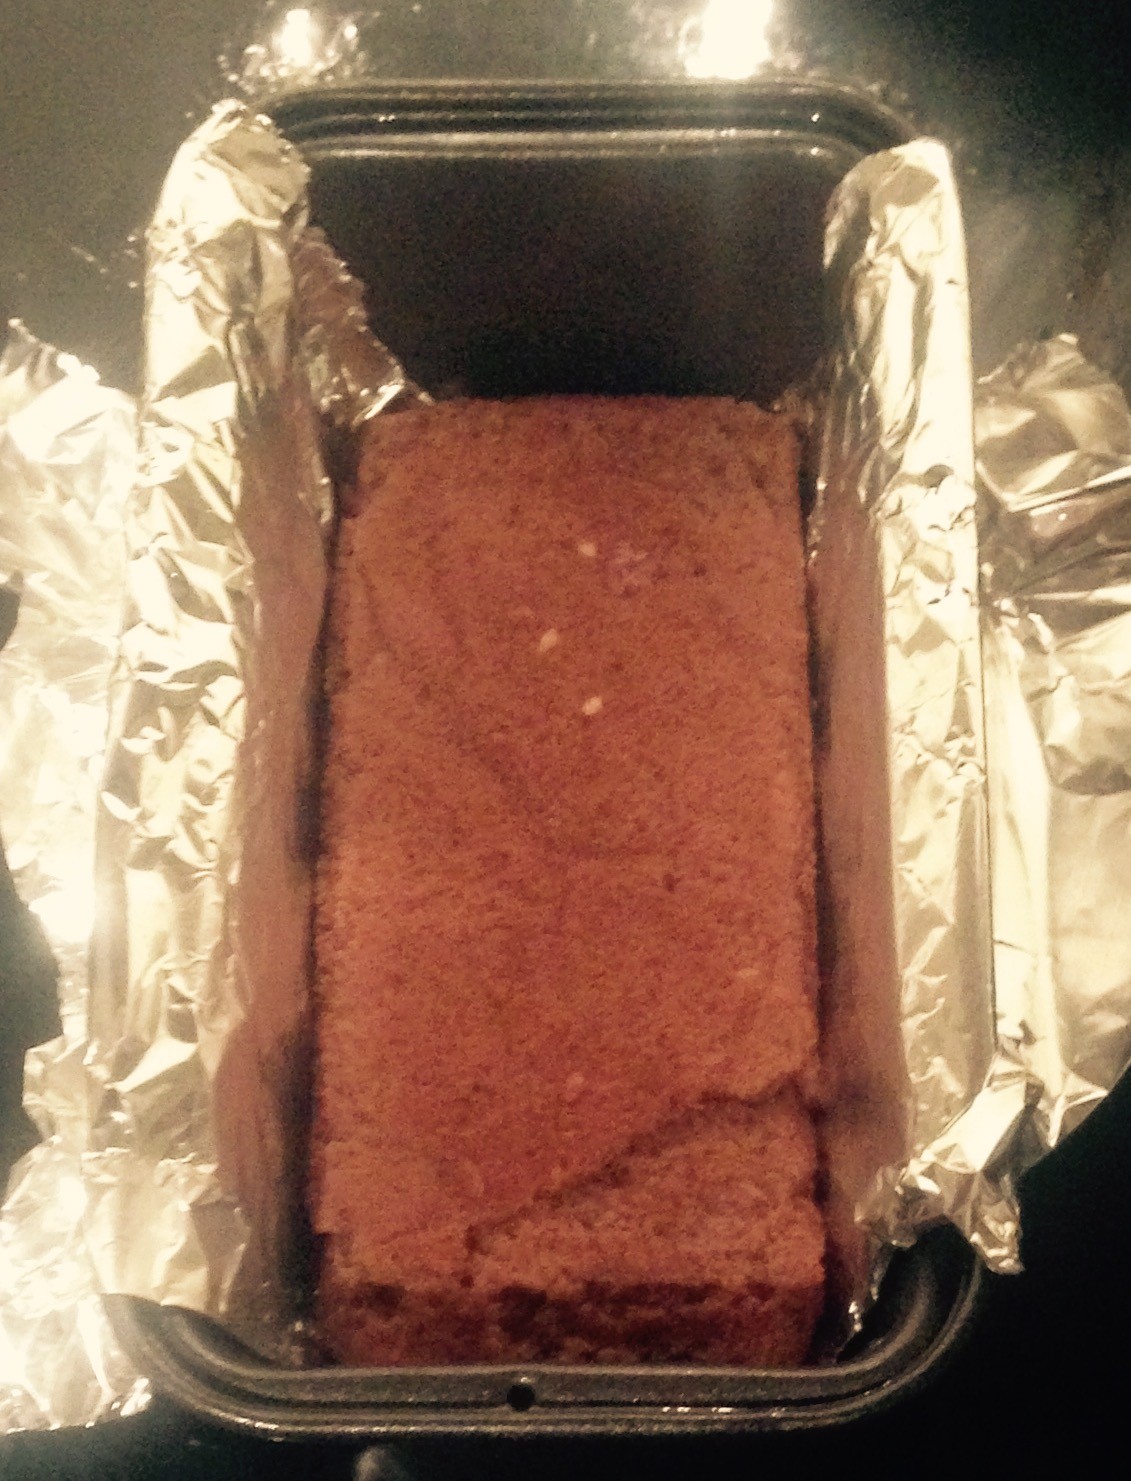
I did make a biscuit base for this recipe but to be honest a store brough base is completely fine as this recipe is all about the brittle.

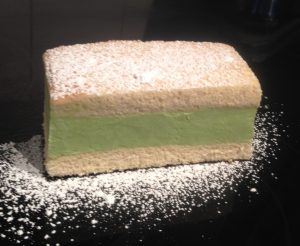
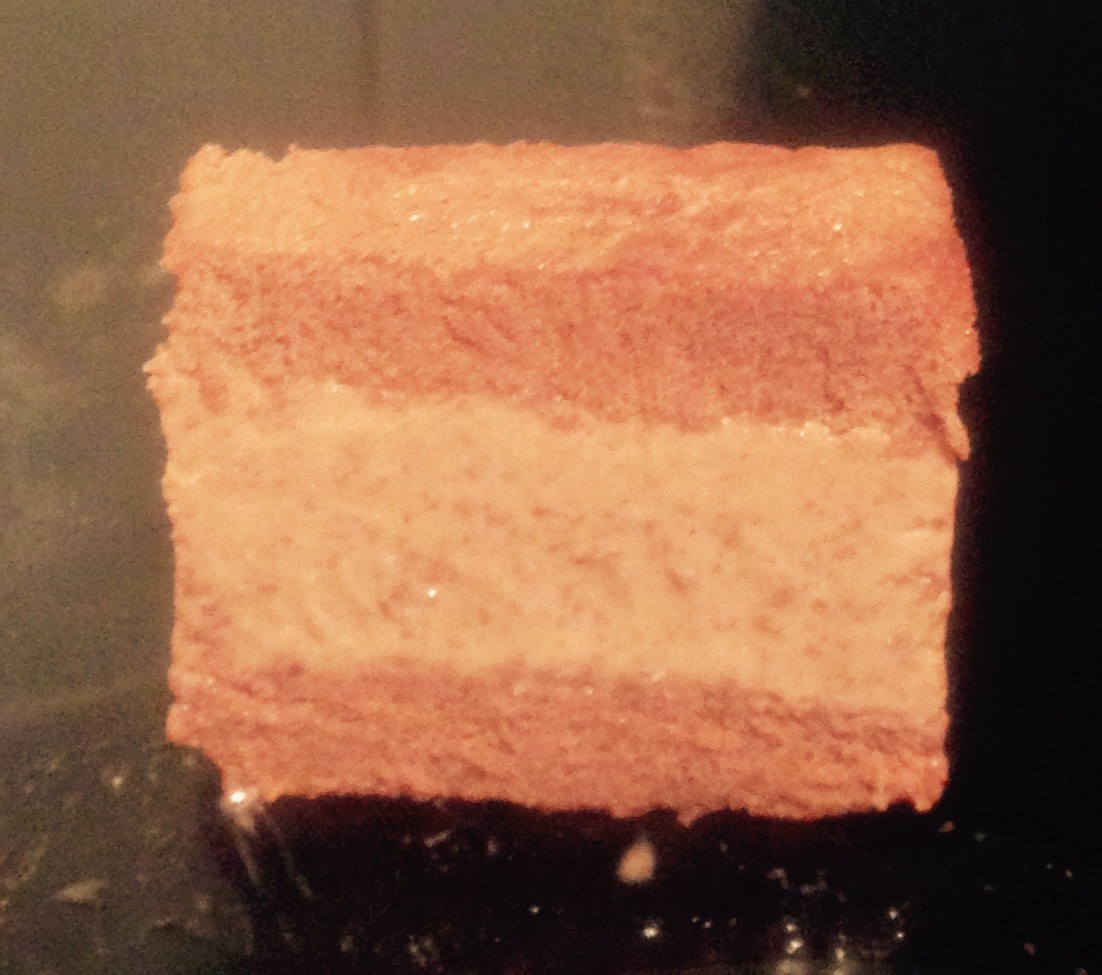
I wanted to make somewhat of a “Maxibon vs. Eskimo Pie” that had complementary layers and textures.

As my favorited flavour in the world is chocolate of course I had to build this layer into the mix and presto a new recipe was born.

Ingredience:

  • 1 cup caster sugar
  • ¼ cup water
  • 1 cup peanuts, chopped salted and toasted
  • 40g butter
  • 1 tsn baking soda
  • 500g vanilla ice-cream, softened
  • ¼ cup cocoa powder
  • Sponge cake, plain store brought

Extra

  • Chocolate ganache
  • Icing sugar


Method:

  1. Line a tray with baking paper.
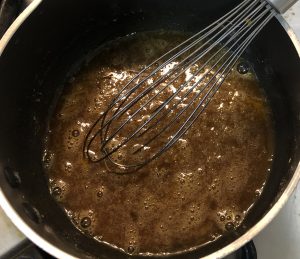
  2. Place the sugar and water in a saucepan, stirring on a low heat until the sugar has dissolved.
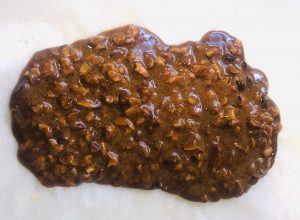
  3. Turn the heat to high, add the nuts and allow the mix to boil until it reaches 110c degrees on a candy thermometer or begins to turn golden.
  4. Take the nut toffee off the heat and stir in the butter and soda.
  5. Pour the mix into the prepared baking paper and allow to completely cool.
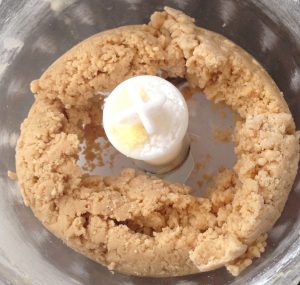
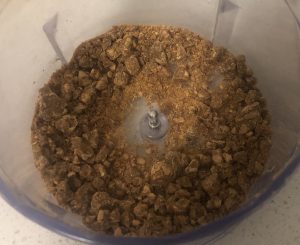
  6. Break the brittle into pieces and place in a food processor, pulsing until they resemble small pieces.
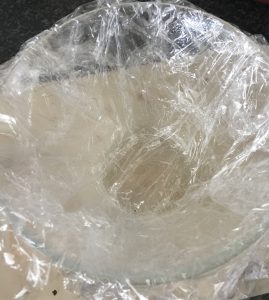
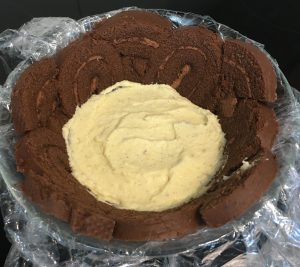
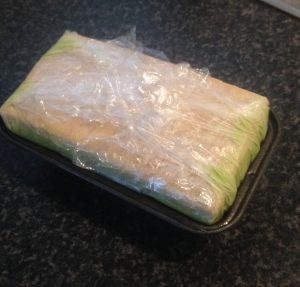
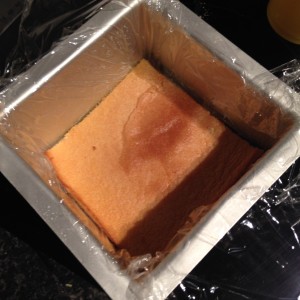
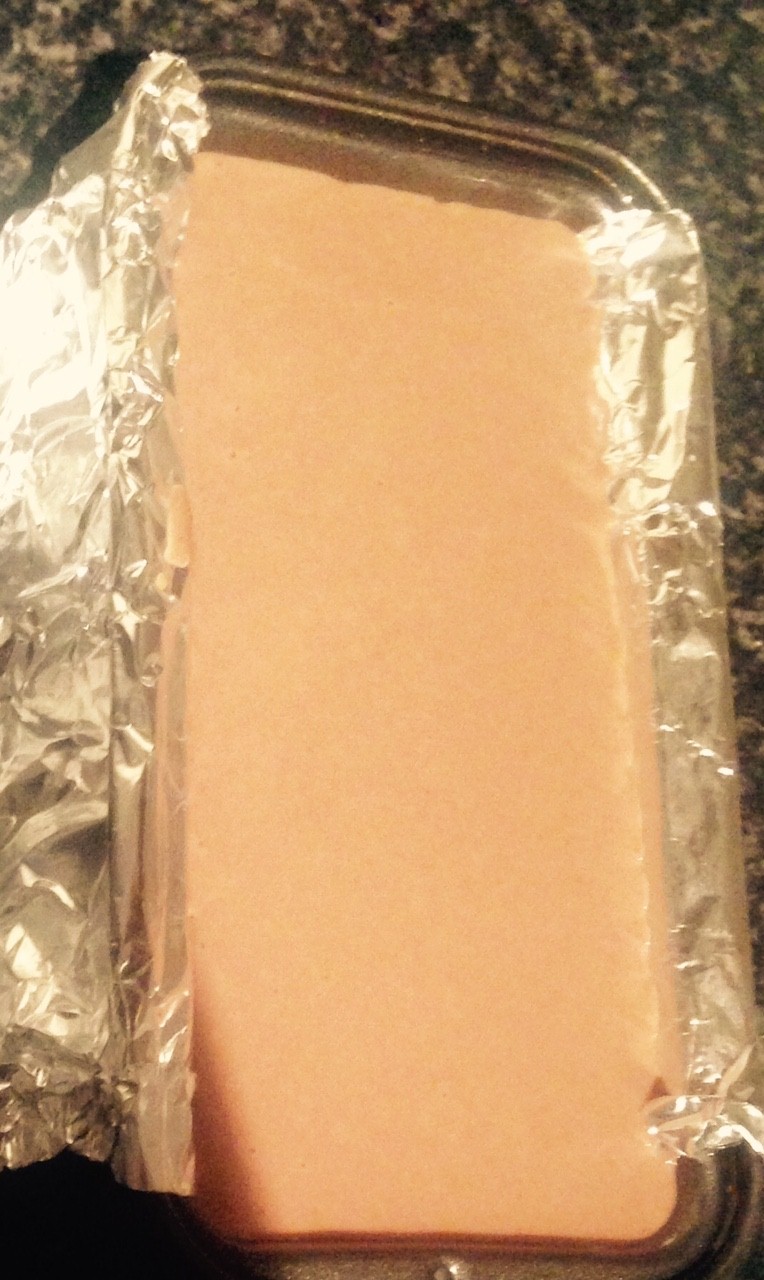
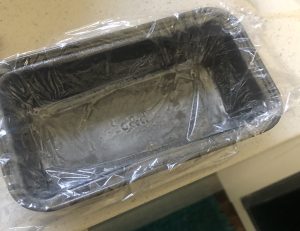
  7. Spray a 10cm x 15cm cake tin with oil spray and then line the tin with 2 layers of clingwrap.
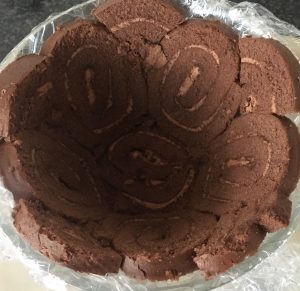
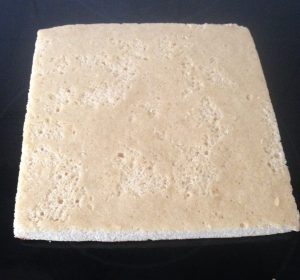
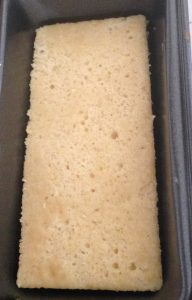
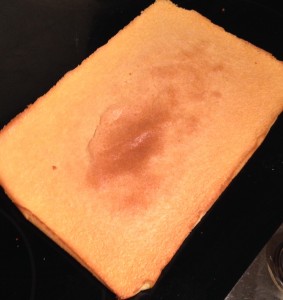
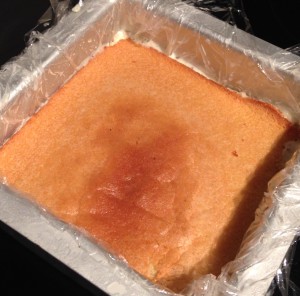
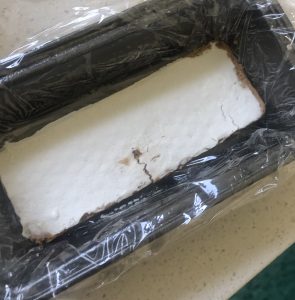
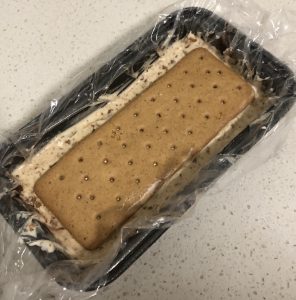
  8. Cut a 2 x 1cm layers of sponge cake the same size as the cake tin’s base.
  9. Place one sponge layer in the bottom of the tin.
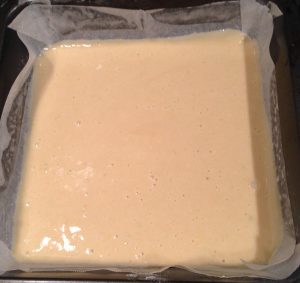
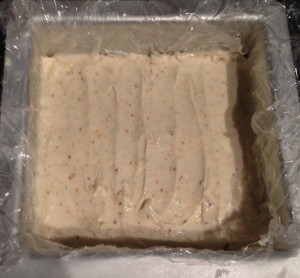
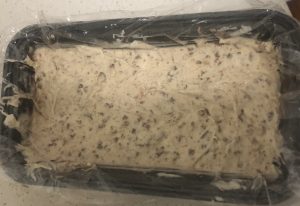
  10. Stir the peanut mix into 250ml of the ice-cream until well combined.
  11. Spoon the peanut ice-cream mix on top of the sponge and even with the back of a spoon.
  12. Place the tin in the freezer to firm.
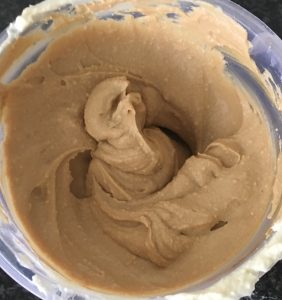
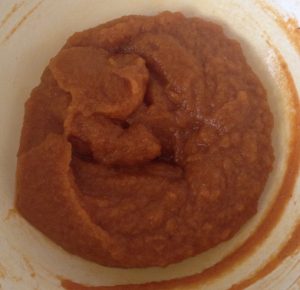
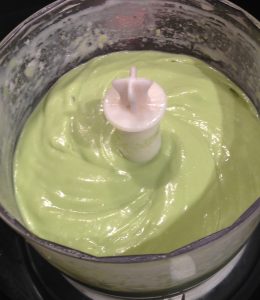
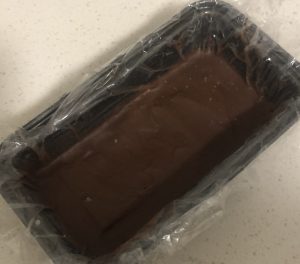
  13. Meanwhile stir the cocoa powder with the remaining 250ml ice-cream.
  14. Spoon the chocolate ice-cream over the top of the peanut ice-cream and even with the back of a spoon in the tin.
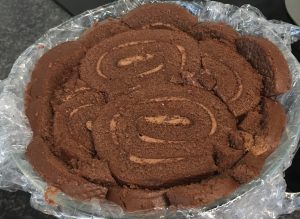
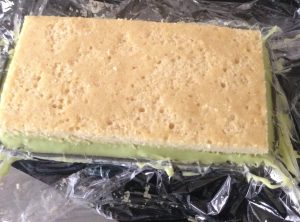
  15. Top the chocolate ice-cream with the 2nd layer of sponge, gently pushing down with your fingertips.
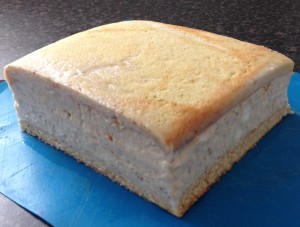
  16. Place the cake in the freezer to completely set (4+ hours, overnight ideal).
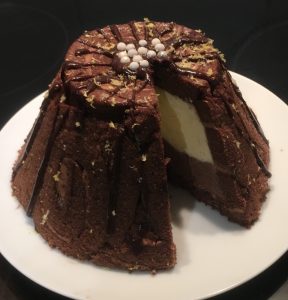
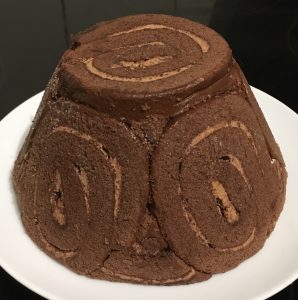
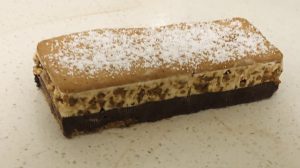
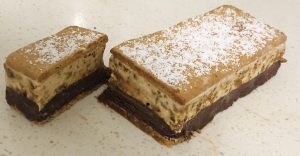
  17. To serve, pull the plastic wrap to release the cake from the tin and place onto a cutting board.
  18. Trim the cake slightly on all 4 sides if needed to ensure a clean straight cake.
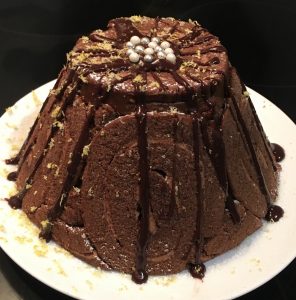
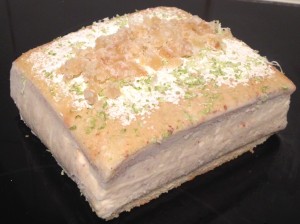
  19. Place the cake onto a plate, dust with icing sugar and a drizzle of chocolate ganache if desired.
  20. Cut into sliced and serve.

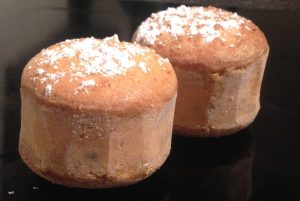
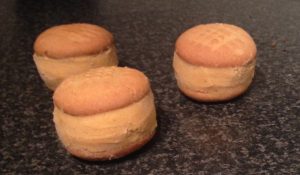
Note: Sponge cake OR as I have used a tin sized biscuit can be used as the top and bottom of the ice-cream sandwich.


Peanut Brittle and chocolate ice-cream sandwich recipe

Step 3


Peanut Brittle and chocolate ice-cream sandwich recipe

Step 5


Peanut Brittle and chocolate ice-cream sandwich recipe

Step 6


Peanut Brittle and chocolate ice-cream sandwich recipe

Step 7


Peanut Brittle and chocolate ice-cream sandwich recipe

Step 8


Peanut Brittle and chocolate ice-cream sandwich recipe

Step 13

Peanut Brittle and chocolate ice-cream sandwich recipe

Step 14


Step 15

Email, RSS Follow
Print
Leave a comment .
Tags: biscuit, chocolate, peanut brittle, Peanut Brittle and Chocolate Ice-Cream Sandwich, sponge .

Marsala and Coffee Ice-Cream Ricotta Cheese Cake

Posted on September 29, 2018 Posted in Ice-cream cake .

Marsala and Coffee Ice-Cream Ricotta Cheese Cake

Masala and Coffee Ice-Cream Cheese Cake recipe

Inspired by the outer layer of trifle varieties and flavour combo of delicious Tiramisu, this experiment is one that resulted in a cake that I could just not stop eating.

My all-time favorite sweet treat (as I have mentioned multiple times) is Tiramisu. I wanted to make a version of this dessert that would keep over a generous period of time so I could enjoy the treat multiple times, oppose to the traditional dessert that really does need to be eaten within a few days of creation.

Thus, making an ice-cream cake made sense. It would keep for weeks (in the freezer), not days. Lastly, as the traditional Tiramisu is not exactly light on the hips I did opt for low fat ricotta and down-weighted the cream volume.

This cake is easy, tasty, quick, with no baking required, and as I mentioned above addictive!

Masala and Coffee Ice-Cream Cheese Cake


Ingredients:

  • 400g chocolate swizz roll
  • 100ml Marsala
  • 300g ricotta cheese
  • 200ml sweetened condensed milk
  • 300ml thickened cream
  • 2 tsn vanilla extract
  • 2 tbsn coffee granules
  • 2 tsn cocoa powder
  • 35g chocolate covered coffee beans


Method:

  1. Spray a 1.5-liter pudding tin or bowl with oil spray, following line the sprayed tin with 2 layers of overlapping plastic wrap.
  2. Cut the swizz roll into 1cm thick slices and place on the bottom and slides of the tin, squashing slightly with fingertips to ensure no gaps.
  3. Using a spoon drizzle 40ml of the Marsala over the swizz roll on the bottom and the sides, evenly covering each piece.
  4. In a food processor blitz the cheese and condensed milk until smooth.
  5. Whisk the cheese mix and 300ml cream with electric beaters in a bowl until peaks start to form (do not over beat or the cream will split).
  6. Spoon half the mix into another bowl and leave aside for later use to make the coffee chocolate layer.
  7. With your original bowl of mix add the vanilla, and remaining 60ml of Marsala, fold until well combined.
  8. Spoon the vanilla & Marsala mix into the bowl on top of the swizz roll and level with the back of a spoon.
  9. Place the tin in the freezer for 30 minutes to firm.
  10. Meanwhile make the coffee mix by placing 15ml of boiling water into a small bowl with the coffee granules, stir until combined, set aside to cool completely before pouring into the remaining bowl of mix.
  11. Add the cocoa powder to the coffee mix and beat on low with electric beaters until just combined.
  12. Chop up the coffee beans until finely diced and fold into the mix until combined.
  13. Spoon the coffee mix over the top of the vanilla and Marsala mix and level with the back of a spoon.
  14. Using the remaining swizz roll slices place on the top of the mix to completely cover the top with no gaps.
  15. Pull the plastic wrap tightly and fold to cover the top of the cake completely, then push down the top of the cake with the bottom of a plate.
  16. Freeze for 4 hours until firm (with the plate as a height on top).
  17. When ready to serve the cake you will need to take the cake out of the freezer 30 mins before. Uncover the plastic wrap on the top and invert (flip) the cake onto a plate.
  18. Remove the plastic wrap completely and top with a drizzle of chocolate ganache (if you desire).
  19. Cut into slices and enjoy!


Masala and Coffee Ice-Cream Cheese Cake recipe
Step 1
Masala and Coffee Ice-Cream Cheese Cake recipe
Step 2
Masala and Coffee Ice-Cream Cheese Cake recipe
Step 7
Masala and Coffee Ice-Cream Cheese Cake recipe
Step 8
Masala and Coffee Ice-Cream Cheese Cake recipe
Step 11
Masala and Coffee Ice-Cream Cheese Cake recipe
Step 14
Masala and Coffee Ice-Cream Cheese Cake recipe
Step 18


Like this recipe? Subscribe via RSS or email to get my new entries and more scrumptious recipes with reviews

Email, RSS Follow
Print
Leave a comment .
Tags: chocolate, coffee, marsala, Marsala and Coffee Ice-Cream Ricotta Cheese Cake, ricotta cheese .

Carrot Cake Ice-Cream Biscuits Sandwich

Posted on April 15, 2018 Posted in Biscuits, Ice-cream cake .

Carrot Cake Ice-Cream Biscuits Sandwich

Carrot Cake Ice-Cream Biscuits Sandwich recipe

This is a really easy and quick ‘cheats’ version of an addictive carrot ice-cream sandwich.

The ‘cheat’ component coming from the use of store purchased vanilla ice-cream (saving you 45 mins prep + setting time) and using pre-cooked tin carrots (saving you 45 mins of prep + roasting the carrots time).

Now by no means am I saying you cannot make your ice-cream from scratch or roast your carrots from raw, however these days you can buy a premium quality vanilla-ice-cream.

I know canned carrots doesn’t sound very appealing but hear me out, once blitzed with the spices this mix will be so tasty you will want to use it as a dip.

This recipe has 2 parts the ice-cream and the biscuit component but let me tell you this ice-cream is the star. Yes my shortbread biscuits are my tried and quadruple tested biscuits that I use as the base to all my shortbread baking but even still this ice-cream is the hero.

To be honest I’m not the biggest fan of carrots but this ice-cream is a moreish tasting carrot cake treat.

I had high hopes for this recipe and OMG it came through with guns blazing.

Carrot Cake Ice-Cream Biscuits Sandwich

Ingredients:

Ice-Cream:

  • 2 x 410g can of cooked carrots
  • ½ tsn ground ginger
  • ½ tsn ground nutmeg
  • 1 tsn ground cinnamon
  • 40g icing sugar
  • 400g vanilla ice-cream

Biscuit:

  •  110g butter, softened
  • 40g custard powder
  • 50g icing sugar
  • 150g flour
  • ½ tsn baking powder
  • 1 tsn ground cinnamon
  • ½ tsn ground ginger
  • ½ tsn ground nutmeg


Method:

  1. Preheat the oven to 180c degrees and line a large baking tray with baking paper.
  2. Take the ice-cream out of the freezer and allow it to soften for 10 minutes.
  3. Place the drained carrots into a food processor and blitz until a puree is formed.
  4. Pass puree through a sieve into a bowl and add the spices and icing sugar. Stir to combine.
  5. Add the ice-cream to the carrot puree mix and beat with a hand whisk until well combined.
  6. Place the ice-cream into the freezer for at least 3 hours to harden.
  7. Meanwhile, place all the biscuit ingredients in a food processor and process until the mix clumps together.
  8. Roll the mix into 12 x 30g balls and place onto the lined tray.
  9. Using a fork push into the center of the ball slightly to form the biscuit shape.
  10. Bake in the oven for 12 minutes or until the biscuits are slightly golden.
  11. Place the biscuits on a cooling tray until cold then in the freezer to chill for 30 mins+.
  12. Take the ice-cream and biscuits out of the freezer.
  13. Sandwich the ice-cream between 2 biscuits using a spoon and remove any excess, place back in the freezer for 20 minute or until ready to serve.


Carrot Cake Ice-Cream Biscuits Sandwich
Step 3
Carrot Cake Ice-Cream Biscuits Sandwich
Step 3
Carrot Cake Ice-Cream Biscuits Sandwich

Step 4

Carrot Cake Ice-Cream Biscuits Sandwich
Step 4
Carrot Cake Ice-Cream Biscuits Sandwich
Step 5
Carrot Cake Ice-Cream Biscuits Sandwich

Step 7

Carrot Cake Ice-Cream Biscuits Sandwich
Step 9
Carrot Cake Ice-Cream Biscuits Sandwich
Step 10
Carrot Cake Ice-Cream Biscuits Sandwich
Step 17


Like this recipe? Please subscribe via RSS or email to get my new entries and more scrumptious recipes with reviews.


Email, RSS Follow
Print
Leave a comment .
Tags: biscuits, carrot, Carrot Cake Ice-Cream Biscuits Sandwich, ice-cream, short bread .

Coconut Lime Avocado Ice-Cream Sandwich Cake

Posted on July 30, 2016 Posted in Ice-cream cake .

Coconut Lime Avocado Ice-Cream Sandwich Cake

Coconut Lime Avocado Ice-Cream Sandwich Cake recipe

You would have noticed I do tend to opt towards chocolate for mouse or tart filings if you frequent my website often. For something a little different I wanted to trial Avocado in this context. Similar to banana, when avocado is frozen and blitzed it resembles a very similar texture to ice-cream. Therefore I decided I would make an avocado ice-cream but also incorporate complementary flavors. Thus the lime and coconut, which work very well with the avo as well as being best buddies in flavor profiles as they are.

To take the ice-cream to the next level I decided to make a thin sponge cake to sandwich the ice-cream in.

This is where I came up with the idea of making a lime and coconut sheet cake.

After a few tweaks I ended up with the below recipe that is quite moreish and a great alternative to a high saturated fat cake.

Ingredients:

Cake:

  • 4 eggwhites
  • 160g sugar
  • 1 + ½ tsn coconut essence
  • 180g flour
  • 2 tsn lime zest

Ice-Cream:

  • 2 avocados (300g)
  • 1 tbsn lime juice
  • 240g sweetened condensed milk
  • 90g coconut milk
  • 1 tsn coconut essence


Method:

  1. Pre-heat the oven to 180c degrees and line a 30 x 30cm cake tin with baking paper.
  2. Place all the cake ingredients in a bowl and using electric beaters whisk for 60 seconds on a low speed.
  3. Pour the mix into the tin and Bake for 10 minutes.
  4. Invert onto a cooling rack and leady aside until cooled.
  5. Meanwhile make the ice-cream but placing all ingredients into a food processor and blitz until the mix is creamy and smooth. Place in the freezer for 30 mins to slightly harden.
  6. Line a 10cm x 15cm cake tin with plastic wrap and cut the cake into 2 10cm x 15cm  pieces.
  7. Trim the first cake piece to fit snug into the base of the cake tin and place in.
  8. Spoon the ice-cream mix ontop of the cake layer.
  9. Push down the second cake layer to secure and wrap the overlapping plastic wrap over the cake tightly.Place in the freezer to set for 3 hours.
  10. Remove the cake from the tin by pulling the plastic wrap and inverting the cake onto a plate.
  11. Top with some dusted icing sugar and serve.


Coconut Lime Avocado Ice-Cream Sandwich Cake recipe
Step 3
Coconut Lime Avocado Ice-Cream Sandwich Cake recipe
Step 4
Coconut Lime Avocado Ice-Cream Sandwich Cake recipe
Step 5
Coconut Lime Avocado Ice-Cream Sandwich Cake recipe
Step 7
Coconut Lime Avocado Ice-Cream Sandwich Cake recipe

Step 8

Coconut Lime Avocado Ice-Cream Sandwich Cake recipe
Step 9
Coconut Lime Avocado Ice-Cream Sandwich Cake recipe

Step 10

Coconut Lime Avocado Ice-Cream Sandwich Cake recipe
Step 11


Like this recipe? Please subscribe via RSS or email to get my new entries and more scrumptious recipes with reviews.

Email, RSS Follow
Print
Leave a comment .
Tags: avocado, coconut, Coconut Lime Avocado Ice-Cream Sandwich Cake, ice-cream, lime .

Frozen Ginger Gin and Citrus Cake

Posted on December 14, 2015 Posted in Cakes, Ice-cream cake .

Frozen Ginger Gin and Citrus Cake

Frozen Ginger Gin and Citrus Cake recipe

For a while now I have been experimenting with a flavor fusion in which I know absolutely works but just can’t seem to make a recipe that is super amazing. Nice and tasty yes but nothing special enough to make it to my blog.

Finally, after a failed ice-cream meringue cake that had an ever-so-tasty ice-cream filling I reworked the recipe to change the meringue into a sponge and the outcome was exactly what I was looking for.

A deliciously fluffy sponge structure and a tasty textured ice-cream filling.

If you’re a fan of gin and ginger cocktails you are going to love this recipe.

Ingredients:

Cake:

  • 4 eggs
  • 140g sugar
  • 120g flour
  • 2 tsn ground ginger
  • 2 tsn lime zest
  • 45ml gin

Filling:

  • 1kg vanilla ice-cream
  • 1 tbsn lemon zest
  • 1 tbsn lime zest
  • 1 tbsn ground ginger
  • 80ml gin
  • 30g almond meal
  • 40g icing sugar

Extra:

  • 10g icing sugar
  • 1 tsn ground ginger
  • 1 tsn lime zest
  • 20g glace ginger (optional)

Method:

  1. Preheat the oven to 180c degrees and line a 20cm x 40cm cake tin with baking paper.
  2. Place all the sponge ingredients in a bowl and using electric beaters whisk on a slow speed for 60 seconds.
  3. Pour the mix into the cake tin and bake in the oven for 10 minutes.
  4. Invert tray onto a cooling rack and leave for 10 minutes.
  5. Meanwhile, to make the ice-cream filling place the ice-cream into a bowl and place in the microwave on medium for 30 seconds.
  6. Add the zest, ginger, gin, almond meal and icing sugar and using a hand whisk beat until well combined.
  7. Peel the baking paper off the cooled sponge cake.
  8. Line a 20cm x 20cm cake tin with 2 layers of plastic wrap, keeping it in place with oil spray.
  9. Cut the sponge in half to make 2 x 20x20cm sponge pieces.
  10. Place one piece in the base of the tin, cutting slightly to fit if need be.
  11. Pour the ice-cream mix into the tin on top of the base until almost to the top.
  12. Add the second cake piece to the top of the tin, push down slightly and place the tin in the freezer overnight to completely set.
  13. To serve, place the bottom of the tin into hot water for 5 seconds, and pull the plastic wrap until the cake is out.
  14. Invert the cake onto a plate and remove the plastic wrap.
  15. To decorate I sieved the icing sugar and ginger over the top of the cake. Sprinkled the zest of the top and scattered the glace ginger.

Frozen Ginger Gin and Citrus Cake recipe

Step 2

Frozen Ginger Gin and Citrus Cake recipe

Step 5

Frozen Ginger Gin and Citrus Cake recipe

Step 7

Frozen Ginger Gin and Citrus Cake recipe

Step 10

Frozen Ginger Gin and Citrus Cake recipe

Step 11

Frozen Ginger Gin and Citrus Cake recipe

Step 12

Frozen Ginger Gin and Citrus Cake recipe

Step 14

Frozen Ginger Gin and Citrus Cake recipe

Step 15


Like this recipe? Subscribe via RSS or email to get my new entries and more scrumptious recipes with reviews.


Email, RSS Follow
Print
Leave a comment .
Tags: citrus, Frozen Ginger Gin and Citrus Cake, gin, ginger, Ice-cream cake, lemon, lime .

Chocolate Chai Ice-Cream Sandwich

Posted on November 9, 2015 Posted in Ice-cream & Sorbet, Ice-cream cake .

Chocolate Chai Ice-Cream Sandwich

Chocolate Chai Ice-Cream Sandwhich recipe

This recipe is like a premium-class version of a maxibon. My favorite ice-cream is definitely the maxibon, the soft biscuit sandwiched with ice-cream side is just amazing!

To give it a prestige makeover I decided on the beautiful flavour mix of chai, ginger and chocolate.

If you make this cake I can guarantee that you will opt for this treat every time over a maxibon!

Chocolate Chai Ice-Cream Sandwhich recipe


Ingredients:

Sponge:

  • 4 eggs
  • 150g sugar
  • 50g flour
  • 1 tbsn cocoa powder
  • 1 tsn chia spice powder

Extra:

  • 100g chocolate ripple biscuits
  • 10g chai powder

Ice-Cream:

  • 480ml thickened cream
  • 170g dark chocolate
  • 4 egg yolks
  • 2 eggs
  • 100g sugar
  • Extra, 70g grated dark chocolate
  • 40g chia spice powder
  • 1 tsn ground ginger


Method:

  1. Pre heat the oven to 180c degrees and line a 30cm x 30cm cake tin with baking paper.
  2. Place all the sponge ingredients in a bowl and using electric beaters on low whisk for 60 seconds.
  3. Pour the mix into the cake tin and bake for 10 minutes.
  4. Remove from the oven and leave the sponge in the tin for 10 minutes then invert onto a cooling rack.
  5. Line a 15cm x 25cm cake tin with 2 layers of aluminuim foil allowing for overhang.
  6. Cut two 14cm x 25cm pieces of the sponge and place one piece in the lined cake tin.
  7. Place the biscuits and 10g chai powder in a food processor and blitz until the mix resembles breadcrumbs.
  8. Sprinkle 40g of the chocolate crumbs over the sponge and place in the freezer.
  9. Place 180ml of the cream in a bowl in the microwave and heat until boiling. Add the chocolate and stir until smooth and glossy.
  10. In another bowl with electric beaters whisk the egg yolks and eggs with the sugar until light and creamy.
  11. Slowly pour the cooled chocolate mix into the egg mix while the beaters are going.
  12. Place the mix in the fridge for 30 mins to thicken.
  13. Beat the remaining 300ml cream until peaks form.
  14. Add the extra grated dark chocolate into the cream as well as the chai powder and ground ginger. Fold until combine.
  15. Fold the cream mix into the chocolate egg mix until combine.
  16. Pour the mix into the cake tin on top of the sponge and smooth the top with a spoon.
  17. Place in the freezer for 15 minutes or until almost set.
  18. Sprinkle 40g chocolate crumbs oven the top of the ice-cream.
  19. Place the 2nd sponge on top of the ice-cream and place back in the freezer for 2 hours or until completely firm.
  20. To serve invert the sandwich onto a platter, remove the aluminium foil and slice thickly.
  21. Sprinkle the remaining chocolate crumbs over the sandwich to serve.


Note:

  • You can decorate with a dust of cocoa powder on the top.


Chocolate Chai Ice-Cream Sandwhich recipe

Step 6

Chocolate Chai Ice-Cream Sandwhich recipe

Step 16


Like this recipe? Subscribe via RSS or email to get my new entries and more scrumptious recipes with reviews.


Email, RSS Follow
Print
Leave a comment .
Tags: chai, Chocolate Chai Ice-Cream Sandwhich, ice-cream, sandwich .

Pages

  • About Me
  • Baking Metrics
  • Blogroll
  • Common Baking Questions
  • Recipe Index
  • Tips & Tricks
  • Contact

Archives

  • February 2022
  • October 2021
  • September 2021
  • August 2021
  • April 2021
  • February 2021
  • January 2021
  • December 2020
  • November 2020
  • October 2020
  • September 2020
  • August 2020
  • July 2020
  • June 2020
  • May 2020
  • September 2019
  • June 2019
  • May 2019
  • April 2019
  • March 2019
  • February 2019
  • January 2019
  • December 2018
  • November 2018
  • October 2018
  • September 2018
  • August 2018
  • July 2018
  • June 2018
  • May 2018
  • April 2018
  • March 2018
  • February 2018
  • January 2018
  • December 2017
  • November 2017
  • October 2017
  • September 2017
  • August 2017
  • July 2017
  • June 2017
  • May 2017
  • April 2017
  • March 2017
  • February 2017
  • January 2017
  • December 2016
  • November 2016
  • October 2016
  • September 2016
  • August 2016
  • July 2016
  • June 2016
  • May 2016
  • April 2016
  • March 2016
  • February 2016
  • January 2016
  • December 2015
  • November 2015
  • October 2015
  • September 2015
  • August 2015
  • July 2015
  • June 2015
  • May 2015
  • April 2015
  • March 2015
  • February 2015
  • January 2015
  • December 2014
  • November 2014
  • October 2014
  • September 2014
  • August 2014
  • July 2014
  • June 2014
  • May 2014
  • April 2014
  • March 2014
  • February 2014
  • January 2014
  • December 2013

Categories

  • America (5)
  • Arabic (1)
  • Australian (2)
  • Biscuits (24)
  • Brazil (1)
  • Bread (12)
  • Brownies (5)
  • Cakes (141)
  • Croatian (1)
  • Cupcakes (20)
  • Custard (1)
  • Doughnuts (6)
  • Flan (1)
  • France (5)
  • Fudge (3)
  • German (1)
  • Greece (2)
  • Hungary (1)
  • Ice-cream & Sorbet (15)
  • Ice-cream cake (6)
  • Icing (18)
  • Italy (4)
  • Jam (1)
  • Jamaican (1)
  • Lebanese (1)
  • Marshmallows (2)
  • Mexican (1)
  • Morocco (1)
  • Mousse (2)
  • Muffins (1)
  • Panna Cotta (1)
  • Pastries (2)
  • Pies (7)
  • Portugal (1)
  • Pudding (12)
  • Roulade (1)
  • Russia (1)
  • Slice (27)
  • Souffle (1)
  • Sweden (1)
  • Swedish (1)
  • Syrup (1)
  • Tarts (13)
  • Traditional (17)
  • Trifile (1)
  • Truffles (5)
  • Turkey (1)
  • Uncategorized (1)
  • Unique (10)

WordPress

  • Register
  • Log in
  • WordPress

Subscribe

  • Entries (RSS)
  • Comments (RSS)

CyberChimps WordPress Themes

© Sweet Tooth Experiments